MyKnowledge
Thursday, October 3, 2024
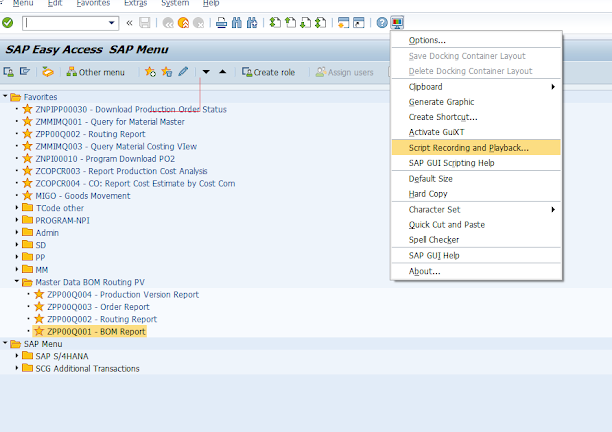
VBS_SCRIPT-Reference Field name SAP
In SAP GUI scripting, there can be differences between the field name you see in the technical information (e.g., "WERKS") and the actual reference used in the script (e.g., "ctxtS_WERKS-LOW"). Here's a breakdown of why this happens and how to interpret these differences:
Breakdown of Field Reference
Field Name (
WERKS):
The field name shown in the technical information (e.g.,WERKS) is the data element or ABAP field name associated with the field in the underlying SAP program or table. This represents the actual business data (e.g., Plant).Scripting Identifier (
ctxtS_WERKS-LOW):ctxt: This part of the reference indicates the type of control in the SAP GUI. For example:txt: Text fieldctxt: Combobox or dropdown fieldpwd: Password fieldbtn: Button
S_WERKS: This part is an SAP-generated name based on the technical field name. Sometimes it is prefixed with an additional character, likeS_, indicating that it is part of a selection screen (S_stands for selection). This is common when you're dealing with selection screens, like in reports (transactions such asSE38or selection screens in standard reports).-LOW: This indicates that the field is part of a range. In selection screens, fields are often part of a range withLOWbeing the lower bound andHIGHbeing the upper bound. For instance:ctxtS_WERKS-LOW: The lower limit (start value) for the Plant (WERKS).ctxtS_WERKS-HIGH: The upper limit (end value) for the Plant (WERKS).
Example Interpretation
- Technical Name:
WERKS(as shown in the technical information window) - Scripting Reference:
ctxtS_WERKS-LOWctxt: Combobox or input fieldS_WERKS: Corresponding to theWERKSfield in the technical informationLOW: Lower bound for a selection range (used in reports and selection screens)
Why the Difference?
The difference between WERKS and ctxtS_WERKS-LOW exists because SAP GUI scripting uses identifiers that represent GUI controls, while the technical information shows the underlying field name. In selection screens (e.g., ME21N, VA01), fields often get additional prefixes and suffixes to differentiate the GUI controls, especially when working with ranges or selection criteria.
How to Match Them
- Technical Info (
WERKS): Use the technical information to get the underlying field name (business logic). - Script Reference (
ctxtS_WERKS-LOW): Use the SAP scripting object inspector or record actions to get the actual script reference for the field (GUI logic).
Both pieces of information are necessary: the technical field name (WERKS) helps with understanding the business object, while the scripting reference (ctxtS_WERKS-LOW) is required for automating interaction via SAP GUI scripting.
Wednesday, July 11, 2018
VB.NET Create Graph
นั่ง งม ทั้งวันจนกระทั่ง แอ่น แอน แอ๊น....... สำเร็จ วุ้ย ถถถถถถถ เรานี่มั่วเก่งเหมือนกัน
Imports System.Windows.Forms.DataVisualization.Charting
Private Sub Button2_Click(sender As Object, e As EventArgs) Handles Button2.Click
Chart1.Titles.Clear()
With Chart1
.Series.Clear()
.Series.Add("Actual")
.Series.Add("Min")
.Series.Add("Max")
End With
Dim vMin As Double = 1.0
Dim vMax As Double = 20.0
For i As Integer = 1 To 10
Dim r As Random = New Random
Dim val As Integer = r.Next(0, 25)
With Chart1
.Series("Actual").Points.AddXY(i, val)
.Series("Min").Points.AddXY(i, vMin)
.Series("Max").Points.AddXY(i, vMax)
End With
Next
With Chart1.Series("Actual")
.ChartType = SeriesChartType.Line
.Color = Color.Blue 'Color.FromArgb(139, 162, 178)
.BorderWidth = 3
.MarkerStyle = MarkerStyle.Circle
.MarkerSize = 10
.MarkerColor = Color.Blue 'Color.FromArgb(181, 201, 205)
.MarkerBorderColor = Color.White 'Color.FromArgb(139, 162, 178)
End With
With Chart1.Series("Min")
.ChartType = SeriesChartType.Line
.Color = Color.Red ' Color.FromArgb(139, 162, 178)
End With
With Chart1.Series("Max")
.ChartType = SeriesChartType.Line
.Color = Color.Red ' Color.FromArgb(139, 162, 178)
End With
With Chart1.ChartAreas(0)
.AxisY.Minimum = vMin
.AxisY.Maximum = vMax
.AxisY.Interval = 2 'Set Scale
.AxisX.MajorGrid.LineDashStyle = DataVisualization.Charting.ChartDashStyle.NotSet
.AxisX.Minimum = 0
.AxisX.Interval = 1
' .AxisY2.MajorGrid.LineDashStyle = ChartDashStyle.NotSet
.AxisY.MajorGrid.LineDashStyle = ChartDashStyle.NotSet
End With
'######### END Chart1 ##################
Chart1.Titles.Add(New Title("Test Title", Docking.Top, New Font("Verdana", 8.0F, FontStyle.Bold), Color.Blue))
End Sub
Friday, November 4, 2016
SQLServer สร้าง Function Text to Datetime
returns datetime
as
begin
declare @DateTimeValue varchar(32)
SELECT @DateTimeValue =convert(varchar, convert(datetime, @DateValue), 111)
+ ' ' + substring(@TimeValue, 1, 2)
+ ':' + substring(@TimeValue, 3, 2)
+ ':' + substring(@TimeValue, 5, 2)
return convert(datetime, @datetimevalue,101)
end
SQLServer การใช้ Cursor
DECLARE @ColFallprotec datetime
DECLARE @ColWorkid int
--------------------------------------------------------DECLARE @MyCursor CURSOR
SET @MyCursor = CURSOR FAST_FORWARD
FOR
SELECT Table_Training_Detalis.DateExpires,Table_Training_Detalis.Worker_ID
FROM Table_Courses
OPEN @MyCursor
FETCH NEXT FROM @MyCursor
INTO @ColExpir,@ColWorkid
WHILE @@FETCH_STATUS = 0
BEGIN
update Table_Workers set WHIMIS= @ColExpir where Worker_ID=@ColWorkid
FETCH NEXT FROM @MyCursor
INTO @ColExpir,@ColWorkid
END
CLOSE @MyCursor
DEALLOCATE @MyCursor
VB.net Datatable รวมการใช้งาน
With tb
.Columns.Add("Matno")
.Columns.Add("MC")
.Columns.Add("Qty")
End With
Dim dr As DataRow
dr = tb.NewRow
dr(0) = "A001"
dr(1) = "MC2"
dr(2) = "120"
tb.Rows.Add(dr)
สามารถเขียนได้อีกวิธีในการเพิ่มแถว ลักษณะนี้จะช่วยให้จำนวนบรรทัดลดลง
และเราไม่จำเป็นต้องประกาศตัวแปร Dim row As DataRow เหมือนตัวอย่างการเพิ่มข้อมูลก่อนหน้านี้
dt.Rows.Add(New Object() {"A001", "MC2", 120.00})
'-----------------------------
---set primary key

Dim table As New DataTable()

table.Columns.Add(New DataColumn("MyColumn"))


Dim primaryKey(1) As DataColumn
primaryKey(0) = table.Columns("MyColumn")
table.PrimaryKey = primaryKey


----------------

update multiple data

 tb202I.Select("mcat = '" & pono & "'").ToList().ForEach(Sub(drow) drow("mordno") = vord)

---------------------


get value from datatable
 Dim rows() As DataRow = dtshippoint2.Select("mvalue = '" & xshippoint & "'")
            If rows.Count > 0 Then
                xlocation = rows(0).Item("mlocation")
            End If

--------------------------------------


   Dim foundRow As DataRow() = dtChange.Select("myid = '" & mynewid & "'")
            If foundRow.Length > 0 Then
                foundRow(0).Delete()
             End If
---------------------------dt2.AcceptChanges()
'----------------------
'Import Text file to Datatable
Dim tb As New DataTable
With tb
.Columns.Add("TrackingNo", GetType(String))
'.Columns.Add("Shorttext", GetType(String))
'.Columns.Add("qty", GetType(Double))
End With
Dim sFilename As String = FTPTextFilePath & filename
Dim myStream As System.IO.StreamReader = New System.IO.StreamReader(sFilename)
Dim line As String
Dim aRow As DataRow
Do
line = myStream.ReadLine()
If line Is Nothing Then
Exit Do
End If
Dim sAry As String() = Split(line, "|")
aRow = tb.NewRow
aRow(0) = sAry(0)
'aRow(1) = sAry(1)
'aRow(2) = CInt(sAry(2))
tb.Rows.Add(aRow)
Loop
myStream.Close()
VB.net ตั้งเวลาการทำงาน Schedule Timer
วิธีนี้จะต้องเปิดโปรแกรมทิ้งไว้ตลอดเวลา
Download Library
Private Sub Form1_Load(sender As System.Object, e As System.EventArgs) Handles MyBase.Load
Dim Timer = New ScheduleTimer()
AddHandler Timer.Elapsed, New ScheduledEventHandler(AddressOf timer_Elapsed)
Timer.AddEvent(New ScheduledTime("Daily", "16:02"))
Timer.Start()
End Sub
Private Sub timer_Elapsed(sender As Object, e As ScheduledEventArgs)
MessageBox.Show("Schedule Working at 16:02")
End Sub
'เมื่อถึงเวลาที่กำหนด ก็จะทำงานตามที่เราต้องการ
'ในความสามารถของ Library ตัวนี้รองรับการกำหนดรูปแบบการทำงานที่หลากหลายมาก เช่น
Run at 6:00 AM on Mondays.
TickTimer.Events.Add(new Schedule.ScheduledTime("Weekly", "1,6:00AM"));
Run every 12 minutes starting on midnight 1/1/2003.
TickTimer.Events.Add(new Schedule.SimpleInterval(new
DateTime("1/1/2003"), TimeSpan.FromMinutes(12)));
Run every 15 minutes from 6:00 AM to 5:00 PM.
TickTimer.Events.Add(
new Schedule.BlockWrapper(
new Schedule.SimpleInterval(new DateTime("1/1/2003"),
TimeSpan.FromMinutes(15)),
"Daily",
"6:00 AM",
"5:00 PM"
)
);


